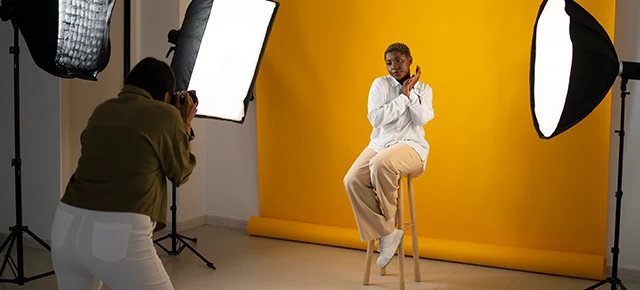


In the realm of photography, lighting is not just a technical necessity; it is an art form that can elevate images from ordinary to extraordinary. In the controlled environment of a photography studio, the manipulation of light becomes a powerful tool for professionals to craft stunning and visually impactful photographs. This blog will delve into the art of lighting in photography studios, offering tips and insights for professionals to enhance their craft and produce captivating visuals.
Continuous Lighting
Continuous lighting sources, such as LED panels or tungsten lights, provide consistent and constant illumination. These are ideal for beginners or those shooting video content, allowing them to see the real-time impact of the light on the subject.
Strobe Lighting
Strobe lights, or flashes, emit brief bursts of intense light, making them highly effective for freezing motion and capturing crisp, well-lit images. They are a staple in professional photography studios, offering versatility and the ability to control the intensity and duration of light.
Modifiers
Light modifiers, such as softboxes, umbrellas, and reflectors, play a crucial role in shaping and diffusing light. Softboxes create a soft, flattering light, while umbrellas spread light more broadly. Reflectors bounce and redirect light, providing fill and eliminating shadows.
The three-point lighting setup is a fundamental technique used in photography studios to achieve a balanced and well-lit image. It consists of:
Key Light
The primary light source that illuminates the subject. It is typically placed at a 45-degree angle from the camera, creating shadows and defining the subject's features.
Fill Light
Positioned opposite the key light, the fill light reduces the contrast created by the key light by filling in shadows. It is often softer and less intense than the key light.
Backlight (Rim Light)
Placed behind the subject, the backlight adds separation by illuminating the edges of the subject, creating a subtle outline. This helps the subject stand out from the background.
Understand the Mood and Concept
Before diving into the technicalities of lighting, it's essential to understand the mood and concept of the photo shoot. Different lighting setups evoke distinct emotions. For example, soft, diffused lighting may be suitable for a romantic portrait, while dramatic, high-contrast lighting might be ideal for a fashion editorial.
Experiment with Light Ratios
Manipulating the ratio between the key and fill lights allows photographers to control the level of contrast in their images. A higher ratio creates more dramatic, defined shadows, while a lower ratio produces softer, more even lighting. Experimenting with different ratios adds versatility to your studio work.
Pay Attention to Color Temperature
Consistency in color temperature is crucial for achieving professional-looking images. Different light sources can have varying color temperatures, leading to unwanted color casts. Ensure that all your lighting equipment, including modifiers, have the same color temperature or can be color-corrected.
Use Light Modifiers Wisely
Light modifiers are invaluable tools for shaping and controlling light. Softboxes and umbrellas diffuse light, reducing harsh shadows and creating a flattering, even illumination. Grids and snoots focus and direct light, allowing for precision in highlighting specific areas of the subject.
Consider the Inverse Square Law
Understanding the Inverse Square Law helps photographers control the falloff of light. According to the law, the intensity of light is inversely proportional to the square of the distance from the light source. This means that moving a light source closer to the subject dramatically increases its impact.
Mastering Rembrandt Lighting
Rembrandt lighting is a classic portrait lighting technique named after the renowned painter. It involves creating a small, triangular highlight on the cheek of the subject, often formed by the key light. Achieving this effect requires careful positioning of the key light at a 45-degree angle from the camera and slightly above the subject's eye level.
Utilize Hair and Background Lights
Hair lights and background lights add dimension to images by separating the subject from the background. A hair light, placed behind and above the subject, highlights the hair and shoulders, while a background light can be used to create gradients or emphasize textures in the backdrop.
Employ Colored Gels for Creative Effect
Colored gels placed over lights can add a creative touch to studio photography. They can be used to evoke specific moods, create visual interest, or even mimic natural lighting conditions. Experimenting with colored gels opens up a realm of creative possibilities.
Practice the Art of Shadow Control
Mastering shadows is crucial in photography. Understanding how shadows interact with the subject and the background allows photographers to sculpt the desired look. Reflectors and fill lights can be strategically employed to control the intensity and direction of shadows.
Maintain Consistency in Studio Lighting Setups
For projects that require multiple shots or a cohesive look, maintaining consistency in lighting setups is key. This includes keeping the position, angle, and intensity of lights consistent across shots. Consistency ensures a polished and professional final result.
Overlooking the Importance of Shadows
Shadows are integral to creating depth and dimension in photography. Avoid eliminating shadows completely, as they contribute to the overall visual interest and realism of an image.
Ignoring White Balance
Neglecting to set the correct white balance can result in color shifts that are challenging to correct in post-processing. Always ensure that your camera's white balance settings match the color temperature of your lighting setup.
Overcomplicating Setups
While experimenting is essential, overcomplicating lighting setups can lead to confusion and inconsistency. Mastering a few key techniques and setups before expanding your repertoire is often more effective.
Underestimating the Power of Post-Processing
Post-processing tools can enhance and fine-tune images, but they should not be relied upon to fix major lighting issues. Strive to achieve the desired look in-camera, and use post-processing as a supplementary tool.
In photography studios, the art of lighting is a dynamic and multifaceted skill that separates the amateurs from the professionals. By mastering the basics of lighting equipment, understanding key lighting setups, and implementing strategic techniques, photographers can elevate their work to new heights. The interplay of light and shadow becomes a canvas upon which creativity flourishes, and each photograph tells a unique and compelling story. Whether capturing portraits, products, or artistic compositions, the art of lighting in photography studios is an ongoing journey of exploration and refinement, where every click of the shutter unveils a new dimension of visual expression. To know more about our wide range of offerings and how they can be of help to you, please get in touch with us.


